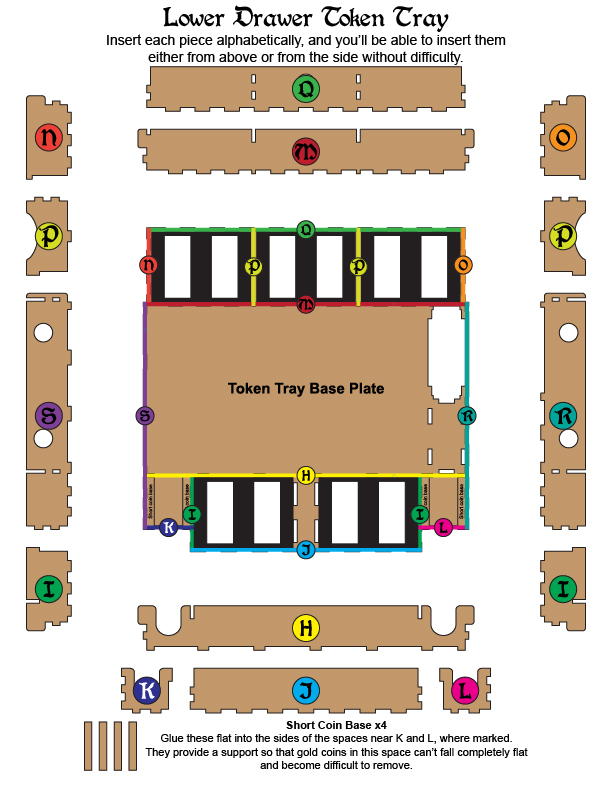
Match the walls to the markings on the sides of the base plate.
Lay the walls next to the base plate with their engravings up.
Apply glue to all the toothed edges, as well as to the dotted areas marked ‘Glue.’
Fold up the walls into a tray.
Apply some weight to the corners as the box dries, to keep the seam together.
Pieces E, F, G (2 of each)
E is a 1/2″ (12mm) thick piece. Apply glue to all sides of E, except the top.
Apply glue to the dotted side of F. There is one F marked for the left side and one for the right.
Insert these pieces, in alphabetical order, into their slots. Push everything down to make sure it’s seated against the bottom of the tray.
1/2 Thick (12mm) Front Panel and Knobs
Find the two brass knobs in your hardware bag and open them, as well as the screw bag inside.
Put the screws in from the back (through piece G) and screw the knob on the front of piece A.
For now, this is just to keep everything aligned while it dries.
Let dry
Push the corners together, and press everything down flat. Try to keep it secure and keep the corners together while it dries. Long bar clamps are useful to hold opposite walls together (brace the box at the corners, not in the center of the walls, or else you’ll just bow the walls inward)
Canned soup is also useful to balance on the corners to hold them down.
Remove the knobs.
1/2 Thick (12mm) Front Panel
Compare the wood grain on the front panel to the front of your chest to determine which way should be up.
Apply glue to the back side of the panel.
The back side of the panel will have some burn marks around the edges.
Wood glue is better, but white glue is fine.
Put the long screw through the corners from the back.
Place the front panel over the screws, then put knobs into the holes in the front panels. Turn the knobs and attach them to the screws.
Use a screwdriver to hold the screws stationary, then twist down both knobs until they are as tight as they can be.
Clamp the front panel to the front of the tray while the glue dries. Clothespins are fine.