RDI Chest 4: Pub Crawl Pull-Down Tray
Back to main instructions page
In order to utilize every possible bit of space inside the chest, it includes a pull-down tray with three deck slots. These slots are too small for characters, but you can split your Rogues & Warriors Deck into three parts and store it here. If your group is like mine, Rogues & Warriors isn’t used in every game, but is pulled out occasionally to spice things up.

- Hinge Support Plate
- Base plate, 6 of piece #, 6 of piece @
- # is 1/4″ thick (6mm), @ is 1/8″ thick (3mm)
- Glue to the side with engraving, marked ‘Glue to this side’
- Glue a @ and # together (engraved sides together) then insert them into the slots. The hooked side goes toward where the hinges will be.
- There are six spaces for these supports.
- Pull-Down Tray
- Very large base plate, 2 of piece T, 2 of piece U, 1 of piece V, one of piece W
- Everything is glued to the side with black squares, not the side with the Rogues & Warriors text.
- Glue two T and two U into the vertical slots in the middle of the large base plate.
- Place V on top.
- Apply glue to the tabs of W and place that on top of V. Put a weight on top while the glue dries. (Such as some canned soup.)
- Screw Blocks (12 of piece ~)
- These provide a hole and backing material for the hinge screws to be screwed into.
- These are glued to the spaces with three lines. Apply a little glue to the space. Glue two plates together (engraved sides together) and set that on the three lines; it should drop in and become harder to move when it’s aligned right.
- There are six spaces for these plates (12 pieces total)
- Velcro Backing Plate
- Thin base plate, 16 marked pieces with notches, 4 unmarked 1/4″ (6mm) wedges
- Everything is glued to the side without black squares.
- Apply glue and insert the 16 notched pieces; they can only go one way.
- Apply glue and insert the four wedge pieces, they can also only go one way.
- Allow everything to dry for now.
Installing into the Lid
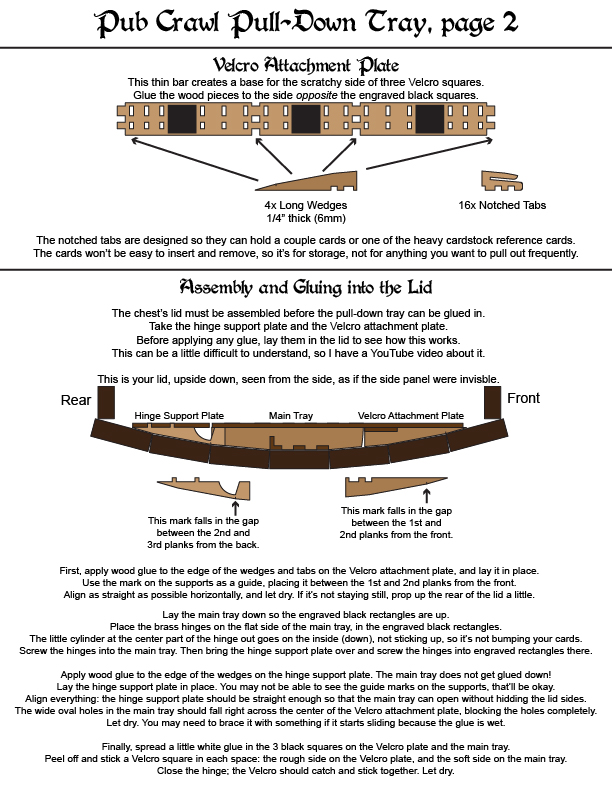
- Plate with the Flip-Down Supports
- This goes toward the rear of the box, with the hooked end of the support toward the front. There are tiny notches cut into each flip-down support, near the cutout. These notches go right on the seam between the 2nd and 3rd planks from the rear.
- Apply wood glue to the top of the flip-down supports, then use the notch to position them correctly.
- Set something on top as it dries, but make sure the weight doesn’t cause it to slide down.
- Plate with the long wedges and notched tabs
- This goes toward the front of the box, with the long points of the wedges pointing toward the front. The wedges have tiny notches cut into them. The notches go right on the seam between the 1st and 2nd planks from the front.
- Apply wood glue to the top of the wedges and tabs, then use the notch to position them correctly.
- Set something on top as it dries, but make sure the weight doesn’t cause it to slide down.
- Large plate
- After the glue has dried, take the tiny hinges and screw them into their holes. They go into the dark rectangles on the support plate and the large plate.
- The bump at the center of the hinge goes downward, so it is hidden inside the joint.
- Screw the three hinges into the support plate first. Then open the hinges all the way, so they’re out of the way. Set the large plate into the lid, then lower each hinge into the dark rectangle on the large plate and screw it down.
- After the glue has dried, take the tiny hinges and screw them into their holes. They go into the dark rectangles on the support plate and the large plate.
- Velcro
- Apply glue to the six large dark squares.
- I’ve found that the adhesive for the Velcro isn’t strong enough on its own, and one side tends to get stuck to the other and pulled off when you pull down the tray.
- Peel and stick the Velcro squares to the dark squares. Place the soft side on the large plate, and the prickly side on the long wedges plate.
- Apply glue to the six large dark squares.