Apply glue along the base plate and tabs, and insert walls 1-8, from back to front.
Wall 7 is split into 7 and 7B.
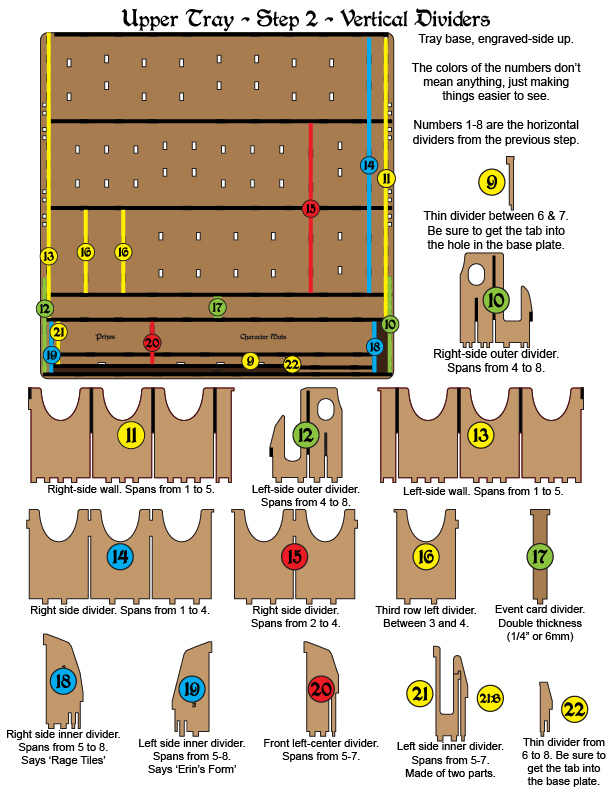
Tiny Divider (9)
Insert between 6 and 7, to the right of center, larger tab facing forward.
You will have extra copies of this, since small pieces can easily be lost.
Right Side Walls (10, 11)
10 goes in the lower-right corner, from walls 4 to 8.
11 is one layer inward, and further back, from walls 1 to 5.
Align the horizontal walls so they drop into the notches on these pieces. They may not stay in for now, but whenever you’re ready to take a break and let the glue dry, clamp pieces together where you can.
Left Side Walls (12, 13)
12 goes in the lower-left corner, from walls 4 to 8.
13 is one layer inward, from walls 1 to 5.
Center Dividers (14, 15, 16, 17)
14 goes on the right side, from walls 1 to 4.
15 is two gaps further in, from walls 2 to 4.
16 goes on the left side of the front row, between walls 3 and 4.
17 is a thicker piece (1/2″ or 6mm) that goes between the event card decks, between walls 4 and 5. It might be in a different bag with other thick pieces.
Building the Front Token Spaces (18, 19, 20, 21, 22)
These pieces are small, and it can be tricky to get their tabs into their slots. Thin objects, like a ruler or a chopstick, to nudge them around will be helpful.
18 says ‘Rage Tiles’. It goes in the lower-right, about half an inch inward, from walls 5 to 8.
19 says ‘Erin’s Form’ and ‘Flute.’ It goes in the lower-left, about a quarter-inch inward, from walls 5 to 8.
20 goes to the left of center, from walls 5 to 7.
21 is a quarter-inch inward from 19, forming the right side of the Flute space, from walls 5 to 7. This piece is thin, so be careful with it.
22 is a small piece that goes to the right of center, from walls 6 to 8.
Side Handles (23)
There are four 23s, which go on the sides of the tray as handles, two on the left and two on the right. The engraved numbers face inward and are hidden. Use wood glue here – these handles will need to hold the weight of all your cards.
Deck Slot Dividers
24 (11 dividers): These always go with the larger tab in the back, small tab toward the front.
25 (6 dividers): These dividers do not have small tabs in the front. Put some glue along the front edge, then use your Slot Guides from the lower deck layer to align these.
26 (5 dividers): These dividers fill up the front card row, but you won’t use all of them. Your set comes with six Drink Deck nameplates, ranging from one slot to five slots wide. Decide how many slots you want to reserve for your drinks. Glue in the nameplate with white glue, so you can pop it out easily later and add more dividers if needed.
0 dividers: Five slots wide. Good if you have every set, sleeved, with a lot of promo cards.
1 divider: Four slots wide. This works for all the non-promo cards sleeved; three should work for all of them unsleeved.
3 dividers: Two slots wide. Enough to bring your favorite 3-4 decks along to game night, and you can store the rest in your extra card box.
4 dividers: You have single-slot nameplates for wide and narrow slots; a wide slot should let you bring two decks, and a narrow slot one.
White glue is recommended for all nameplates, but especially here; as more characters are released, you may want to pop out your Drink Deck nameplate and replace it with a smaller one to create more deck slots. (Save your extra 26 dividers and nameplates!)
Thin Inserts
Insert in front of flute: A tall, darkened piece. Goes between 19 and 21, and between walls 6 and 7. Insert with the higher tab to the back.
Erin’s Form Insert: A curved, darkened piece. Goes between 12 and 19. Insert with the flat edge at the bottom, and the curve being high in the front, low in the back.
Push these down firmly, all the way to the base plate. Just a touch of glue will hold them in place permanently.
Clamp and Check
Check connections and apply extra glue.
A little wood glue along the base of the side walls is good for strength.
Use bar clamps to clamp left-to-right.
Use clothespins to clamp layers together.
Check that layers are aligned.
Check that walls are vertical and tabs are well-seated (neither sticking out past the wall, nor not fully inserted into the wall).
Tap on the top of pieces with a rubber mallet, or just tap gently with a standard hammer.
Double-check the rear wall, wall 1; maybe lean something against that to keep it vertical while the glue dries.
Push everything down flat against the base plate.
Lay something across the top to weigh things down.
Clamp, brace, check, clamp, wait. Be obsessive; it’s much easier to fix issues while the glue is still wet.